At a time when almost every gadget is “smart” and telecommuting is changing how we work, managing a corporate network is more difficult than ever. Fortunately, as networks increase in complexity, the range of tools available to network administrators continues to expand as well. At Ubiquiti, we are constantly working to empower our customers by making it easier to integrate our product with these technologies.
One of these tools we have been able to better integrate with our UniFi products is RADIUS Authentication. While by no means a new technology, its utility has grown over recent years. Many corporate networks use RADIUS- and for good reason. As BYOD is here to stay it is hard to imagine a world where RADIUS Authentication doesn’t have a place.
UniFi and RADIUS work well together. UniFi allows you to manage your network in every location no matter how remote and with RADIUS you can use the same login at each site.
In this blog post I’ll explain how RADIUS works then show you how to integrate it with UniFi.
What is RADIUS Authentication?
RADIUS (Remote Authentication Dial In User Service) is a popular network protocol that provides for the AAA (Authentication, Authorization, and Accounting) needs of modern IT environments. RADIUS equips administrators with the means to better manage network access by helping to provide a greater degree of security, control and monitoring. In basic terms, RADIUS allows remote users connecting to wireless networks to identify themselves and subsequently receive access to what they require.
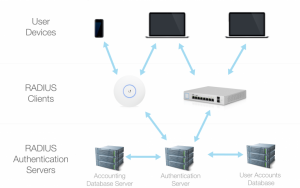
When RADIUS-backed authentication is initiated, an authentication request and credentials are sent from the user’s device to the RADIUS client. The RADIUS client forwards this request on to the RADIUS authentication server to check against pre-defined rules/a user accounts database. An accepting-response is sent back to the users device via the client if the request meets the necessary requirements. The accounting feature if enabled, provides administrators with additional information like session length and bandwidth.
With UniFi, our Access Points/UniFi Switch once configured can also act as the RADIUS client to help authenticate users/devices with the the RADIUS authentication servers. Setting up your RADIUS configuration on your network may take quite a bit of time- but incorporating it into UniFi is simple.
I setup two servers (Linux and Windows) on my home network to act as authentication servers- and was able to confirm that only two steps are required to integrate a working RADIUS configuration with a UniFi-managed network. These are:
- Define the Access Points/UniFi Switch as RADIUS Clients on your RADIUS Server and create a shared secret/password to be added into UniFi Settings.
- Add your RADIUS Server/RADIUS Proxy Server to your network in the UniFi Controller.
I’ll show you how to do both in detail- through a Windows Server RADIUS Configuration through NPS as well as a Ubuntu Linux Authentication server.
Microsoft Windows Server 2012 R2
RADIUS Configurations in Windows can be set up through the Network Policy Server (NPS) which is a feature you can add to your Windows Server installation through NAP. In many networks, Windows NPS is a good choice as it integrates with users/rights associated with Active Directory.
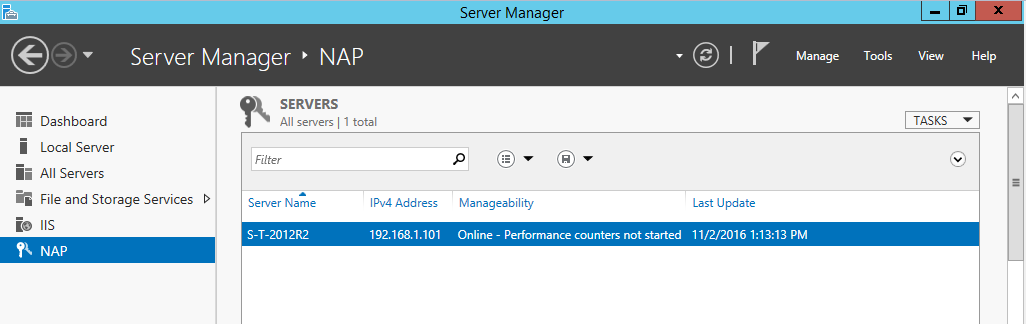
To demonstrate, I set up a new Windows Server 2012 R2 VM to act as my authentication server.
Once you’ve configured your NPS server as a RADIUS server, your UAP/US can be added as a RADIUS Client by right-clicking “RADIUS Clients” and selecting “New”.

To add my UAP-AC-PRO as a client, I entered the device’s IP address and gave it the friendly name “apradius1” and manually entered a “Shared Secret”. The Shared Secret is used to verify that the RADIUS client is allowed to process auth-requests through the RADIUS server. In larger environments, it may be wise to set up a “Shared Secrets template” to save some time instead of adding each individually.
To finalize the server configuration, I verified the necessary ports were opened (1812 for Authorization, 1813 for Accounting) to allow the server to receive request.
Note: If you run into any issues authenticating to the wireless network using PEAP like I did, I simply needed to import a certificate to my server for Server Authentication purposes. It then worked without a hitch.
Linux FreeRADIUS Configuration
To setup and test a Linux RADIUS authentication server, I installed the latest version of Ubuntu (16.10) on a VM. While Ubuntu doesn’t natively support RADIUS functionality, there’s a great open-source option FreeRADIUS readily available to Linux admins as a binary package. FreeRADIUS is one of the most popular options out there- and it makes sense- it’s free and makes setting up FreeRADIUS a pretty easy process even for Linux amateurs like myself. (See their in-depth and helpful guide here)
Here’s a brief walkthrough of the steps I had to take to get my Ubuntu FreeRADIUS server working with my UniFi APs in my network.
First, I installed FreeRADIUS using the following command:
$ sudo apt-get install freeradius
Next, I opened the default ports used for RADIUS Authentication (1812) and Accounting (1813). After creating these necessary firewall exceptions, I was ready to configure the server.
To add an AP as a client, you will need to edit the clients.conf configuration file. My clients.conf file was in the /etc/freeradius directory.
To add my AP, I followed the instructions in this file. I added my UAP-AC-PRO, which again I named “apradius1”. Attached to this client, I provided the IP address of the AP as well as the secret. This is what I put into the Clients.conf file:
client apradius1 {
       ipaddr = 192.168.1.139
       secret = secret1234
}
The only other file I had to edit was the Users file in the same directory to provide an account credentials to test with. If not for testing purposes, administrators will likely not want to create accounts and input the plain-text password.
A number of modules can be used to check user credentials against an encrypted user DB. For example, many admins integrate FreeRADIUS with LDAP by adding on the LDAP component to FreeRADIUS (see resources here). For simplicity’s sake however, I simply added a fake users credentials to allow me to test the RADIUS function.
Adding a RADIUS Server to UniFi Settings
To configure your UniFi managed network, simply open your controller and complete the following steps:
- Go to Settings > Wireless Networks
- Create a new network or modify an existing Network by clicking “Edit”.
- Select “WPA Enterprise” under security
- Under “RADIUS Auth Server” enter the IP Address of the RADIUS or RADIUS Proxy Server
- Enter the port used by RADIUS Server for authorization, by default 1812
- In the password field, enter the shared secret you assigned to the access point as a radius client.
Optional steps- only needed for RADIUS Accounting Functionality:
- Click “+RADIUS Accounting Server”
- Add IP, Port (1813 by default) and Shared Secret for accounting on RADIUS Server.
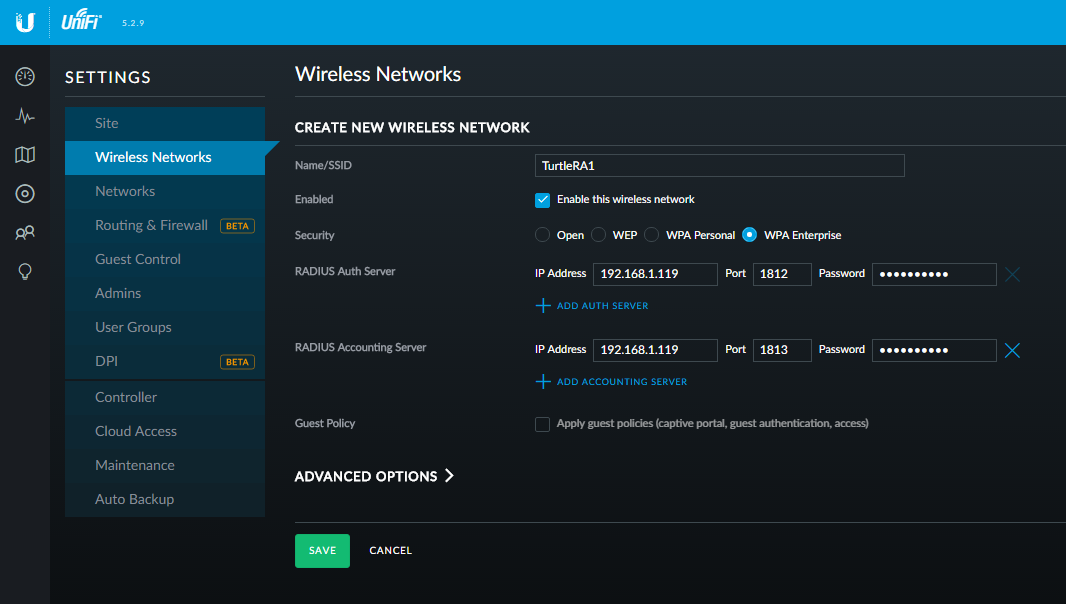
To complete my RADIUS configuration in my UniFi Controller, I followed these steps and selected the network “TurtleRA1”, chose “WPA Enterprise” under security and under “RADIUS Auth Server” added the IP address of my RADIUS authentication server. I entered port 1812, and for the Password field, the shared secret I had created earlier. I clicked “Save” to apply the changes.
Authenticating Client Devices with EAP Method
After you have finished configuration-test whether everything works by connecting a device to the RADIUS network. Connecting to an AP with RADIUS functionality enabled will prompt you to select the EAP method. Select any method you have authorized on your RADIUS server.
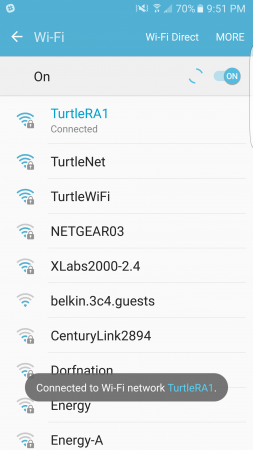
To test my new RADIUS setup, I connected my mobile phone to my new network “TurtleRA1”.
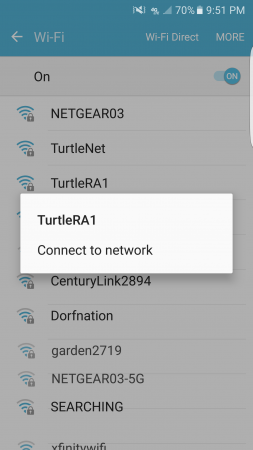
I selected PEAP (Protected Extensible Authentication Protocol), as I had already verified it was enabled on my RADIUS server.
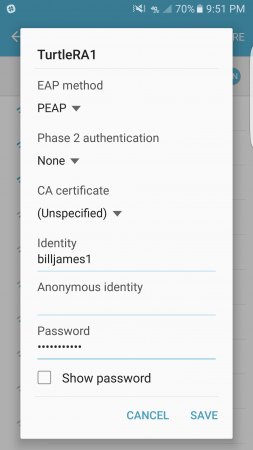
After entering test credentials, I clicked “Save”. The AP authenticated with the RADIUS server allowing my device to connect successfully.
Setting up RADIUS with UniFi has never been easier. Stay tuned in future weeks as we’ll be adding to our RADIUS-related documentation. These articles will provide added guidance on setting up accounting, troubleshooting failed authentication requests and more.
Source: Blog Ubnt
